How to use 3D Slicer with Supervisely to Annotate Medical Training Datasets At Scale | Computer Vision Guide

Discover how to unlock the power of annotating 3D medical images and boost teamwork collaboration by using the best of both worlds.

Table of Contents
Launch 3D Slicer integration
Supervisely has numerous clients from the medical sector, who find our multifunctional medical labeling toolkit for DICOM, NRRD and NIfTI indispensable for their annotation needs. With the Computer Vision platform, designed for medical annotation, users can seamlessly organize labeling processes through Labeling Queues or Labeling Jobs, simplifying tasks such as data preparation, pre-labeling, annotation, tracking changes, and accessing activity logs and workforce statistics. It is especially important to organize an efficient Computer Vision pipeline for CT and MRI data annotation, reviewing and quality assurance because the time of doctors and physicians is limited and quite expensive.
In some cases, a customer's data workflow may require integration with other tools. Responding to such needs and feature requests, we are excited to announce 🚀 Supervisely integration with 3D Slicer - open-source medical software for analysis and visualization of 2D and 3D medical images.
3D Slicer, a widely utilized product with a thriving community, offers a variety of integrations designed to solve specific tasks. This symbiotic integration enhances the capabilities of both platforms, enabling them to realize their full potential.

In this post, we'll guide you through using 3D Slicer alongside with Computer Vision platform for organizing and managing efficient collaboration and training data labeling. To learn more check out our complete guide on Supervisely's Medical Annotation Toolbox and watch the 5-minute quickstart video tutorial on YouTube.
Video tutorial
In this video, I will take only 8 minutes of your time to demonstrate the key points of the most common pipeline of working with medical data, which receives an incredible improvement thanks to this integration.
- I will show workspace and data preparation with team organization.
- You will see creating and performing the annotation task as known as Labeling Job.
- We will familiarize ourselves with the 3D Slicer Extension - ConnectToSupervisely and the effective use of its modules.
- Most importantly, I will demonstrate how we can seamlessly switch between the application and the web interface during data annotation: I will begin annotating objects in the web interface of Supervisely, switch to 3D Slicer for 3D editing, and then return to the web interface to complete the task.
More powerful together
3D Slicer is supported by a growing international community of users and developers with incredible expertise in the medical domain. However, there may be some functionality missing simply because this software was not designed to cover end-to-end Computer Vision workflows.
How Supervisely boosts 3D Slicer:
-
You can work with your data in a web browser. If you need to visualize or edit data but don't have a device with 3D Slicer installed, just log in to Supervisey and you're ready to go.
-
You have the ability to scale up the organization of annotation processes for a large team of ML specialists and domain experts.
-
There are collaboration features such as user permissions, access control, external authorization (SSO, OpenID, LDAP), labeling & review tasks and many more.
-
It is possible to simultaneously annotate the same data by different users for covering consensus labeling scenarios.
-
Activity and performance tracking is provided for annotators.
-
Export formats for training data have more options.
-
Availability of different annotation tools that are often required in Computer Vision projects such as tags and attributes.
-
Cloud storage support is provided for secure access to data. Now data is not only stored locally on annotators' computers.
-
Access to Machine Learning tools and Neural Network toolboxes for model training and pre-labeling.
💪 Integration with Supervisely Full-stack Computer Vision platform eliminates existing 3D Slicer limitations and opens up new ways of organizing the smooth work of data scientists, annotation workforce, managers and domain experts within a single web-based secure environment.
Our annotation toolbox is designed based on the experience of professionals from different industries from medicine to self-driving cars and agriculture, making it as convenient and at the same time as functional as possible. On the other hand, 3D Slicer has been evolving for many years and contains many vertical niche-specific annotation solutions and visualization tools based on extensive community experience.
In some cases, while working with the Supervisely platform, there is a need to use 3D Slicer for specific tasks. Since we support DICOM and other popular formats for medical data volumes and the annotation objects for them are 3D mask volumes, 3D Slicer can work with this data directly out of the box. So from here comes that this integration is significant for users of both platforms.
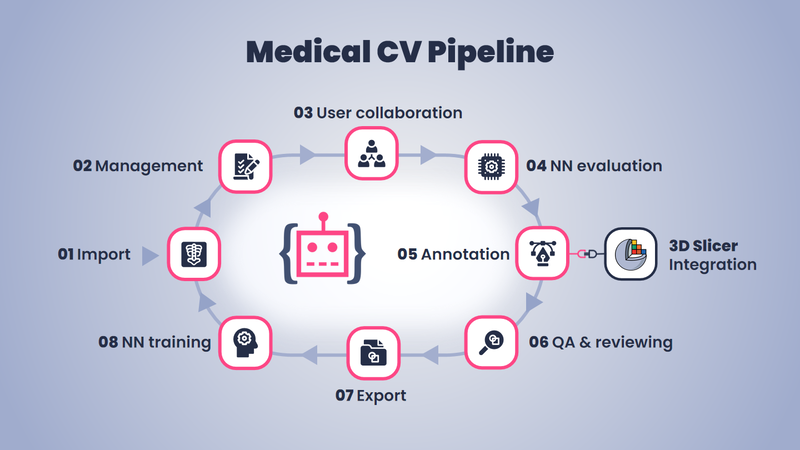 An example of the most common pipeline for working with medical data.
By using Supervisely CV platform, data processing and 3D object annotation can be simplified with various integrated AI-powered and automation tools. Thus, the combination of neural networks pre-labeling, interactivity and efficient manual annotation tools will greatly speed up the process of labeling and preparing medical training datasets for 3D volumes.
How to use 3D Slicer with Supervisely?
Supervisely released an easy-to-use extension for the 3D Slicer Plugins Catalog - ConnectToSupervisely. Please, find below the detailed tutorial on how to prepare the data, install and use this 3D Slicer extension for your medical annotation projects.
Let's check out how to use the extension in simple terms:
-
Create a new project and import data on the Supervisely platform.
-
Create a Labeling Job and assign it to annotators.
-
Open 3D Slicer and the extension module.
-
Log in to Supervisely with the account that has the corresponding task.
-
Select the required Labeling Job and Start the labeling or reviewing process.
-
Complete the assignment described in the info.
-
Submit the result to the Supervisely platform.
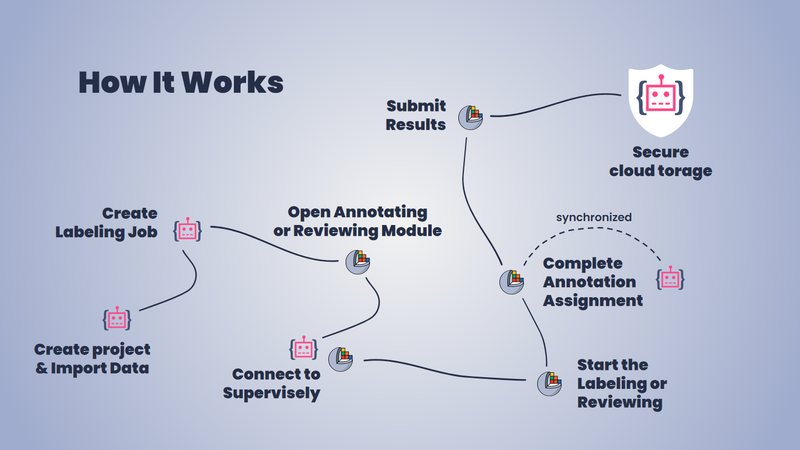 ConnectToSupervisely extension module workflow
The extension has two modules:
Labeling Jobs Annotatingfor annotators to do the actual labelingLabeling Jobs Reviewingfor reviewers to validate and correct annotations.
 Labeling Jobs Annotating
In terms of user interface, these modules look the same with little difference in functionality.
Step 1: Import data and prepare workspace
It is very easy to import data, but before that, I will briefly tell you how data storage is organized on the platform and how user management works. For a full immersion in platform knowledge, you can check out the great video course
To begin, you'll need to set up an account to access the platform, and the registration process is quite simple. If you want to use the free version of the platform and evaluate its capabilities, go to the Community Edition platform website. If you are an Enterprise Edition user, you will have your own address to access the platform.
Once you register and log into the platform, you'll become a member of the automatically created team, likely named Team of <your login>, with the default First Workspace already selected.
- Within a Team, users share resources such as projects and models, with each user's activities tied to the selected team upon login. Entities like projects can only be created within a team, and users can switch between teams or create new ones from the left menu.
- Workspace facilitates collaboration within teams by providing separate "rooms" where users can organize their projects and datasets. Each team must have at least one workspace, allowing users to switch between different sets of experiments and tasks within the same team environment.
You will immediately be taken to the main workspace page - Projects.
- Project is a combination of datasets and related meta information (like classes and tags) and it's a major building block of data organization in Supervisely.
- Dataset is the second most important concept. This is like a folder where your data is stored.
On this page, you will find tools to create a project and import your data. Just click on Import Data and follow the instructions.
Create the Сlasses and Tags that we will need later for annotation.
Now we have a prepared project, and we can create a Labeling Job to annotate this data. To do this, we need to add annotators in our Team.
In the lower-left corner in the Current Team section, click on the name and go to Manage Members. In the opened Team Members, click on the INVITE button, type in the login and select the appropriate role, for example, Annotator.

Step 2: Create Labeling Job
One of the main purposes of Labeling Jobs is to create annotations, and at such times, specific tasks may arise. In this case, the integration of 3D Slicer into Supervisely processes will be just right, because the developed extension is based on the work with Labeling Jobs.
Labeling Job in a Nutshell
Labeling Jobs is a powerful tool for efficiently organizing and distributing data annotation tasks within a team. It ensures annotators work on well-defined portions of the dataset, follow consistent guidelines, and contribute to the project's success while maintaining data quality and accuracy. It's a critical component of effective team coordination in data annotation efforts.
You can read more about Labeling Jobs in our blog post "Mastering Labeling Jobs: Your Ultimate Guide".
So, once the team is organized, you can go to the Labeling Jobs section in the left sidebar.
The page that opens will have links that will help you figure out how to work with Labeling Jobs if you haven't already seen the blog post linked above.
In the upper right corner, click on the + NEW button.
Describe the task for the Labeling Job, select a Team member who will do the markup, a reviewer, a project we recently created, classes and tags that will be available for annotation - this is the minimum set of things you need to successfully create Labeling Job.
Step 3: Install extension
The extension works on Linux, macOS and Windows operating systems.
We recommend to install it directly from 3D Slicer software.
There are two ways to install the extension:
- From the Extension Catalog
- From the local archive file
- downloaded from extensions catalog
- downloaded from the GitHub releases
Install from the Extension Catalog in the application
→ Go to the Install Extensions tab
→ Type
Supervisely in the search field
→ Click the Install button under the extensions description
☝️ If you get an error when you click on the "Install" button,
sometimes updating the catalog using the "Check for updates" button helps.
Install from the downloaded archive file
The files for different OS can be found on the extension catalog website and in the releases on the extension page on GitHub. Please, do not forget to select your Operating System in the right top corner of the web page.
Follow these steps:
- Once you have downloaded the file, go to
Extension Manager Wizardof 3D Slicer application and select the option toInstall from file. - Select the downloaded file and click
Open. After installing an extension, you will be prompted to reboot the application. - After rebooting, the first time you open any of the modules, you will see an information window about the installation of Supervisely Python SDK, which is required for the extension to work.
Waituntil the installation is complete. - Once installed, 3D Slicer will automatically reboot, and you can start working.
☝️Please note that each release is marked with the 3D Slicer version for which the installation files are built. Installing on a different version may fail. In such cases, it's recommended to use the first installation option.
Step 4: Open extension in 3D Slicer
After the extension has been installed and the 3D Slicer has restarted, you can open one of the modules by selecting the Supervisely tab in the list of modules.
Pro Tip
In order to get quick access to modules perform the following actions:
Edit menu on the top bar
→ Go to the
Application Settings
→ Choose the
Modules section
→ Find in the Modules unit Supervisely's modules
→ Drag and drop them to the
Favorite Modules unit and save with the OK button
Next, I will tell you in detail about the elements of the extension.
Authentication Tab
Here the authorization process takes place on the Supervisely server you are working with, on which your data is located.
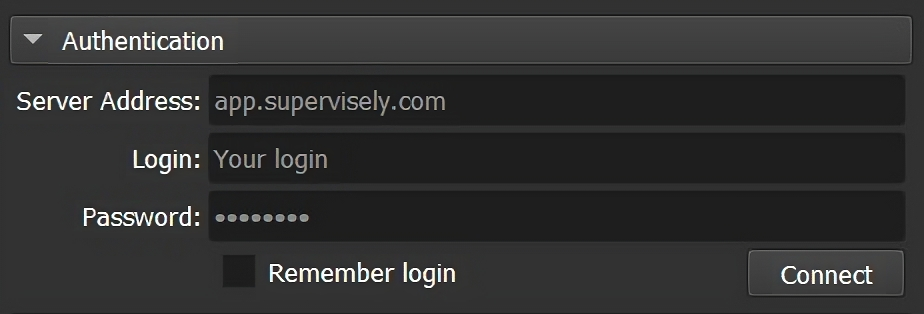 Enter credentials here
If you're working on a single account and don't want to re-enter data each time, use the Remember login setting. The extension will not store the entered data, and all subsequent authorizations will go through the received API token, which will be stored in a separate .env file in the current user directory of the operating system.
 You will be automatically logged in
Teams and Jobs Tab
Once logged in, you'll be able to see the Labeling Jobs available to you within the teams you're a member of.
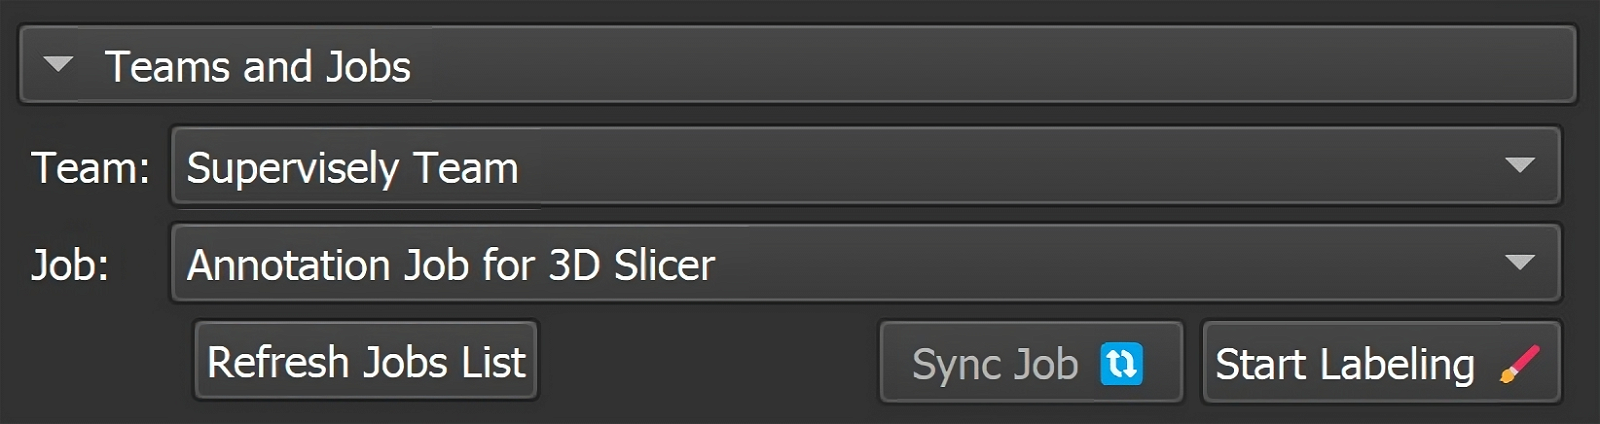 Team and Jobs
Only those Jobs whose status is Pending or In progress, and you are the annotator for them, are displayed in the list.
You can update the list of available Jobs for the current Team at any time by clicking Refresh Jobs List, it won't reset your current workflow.
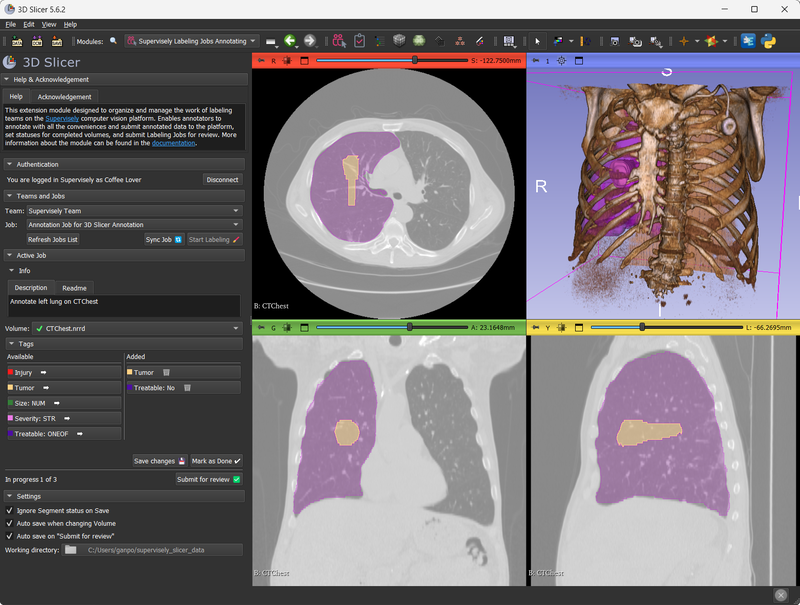
Active Job Tab
In the Labeling Jobs Annotating module, this tab contains the Info tab where you can view the Job description and the list of Volumes to be annotated. There you can edit Tags and set statuses for Volumes, see how many Volumes have already been annotated, and send Labeling Job for review after the work is done.
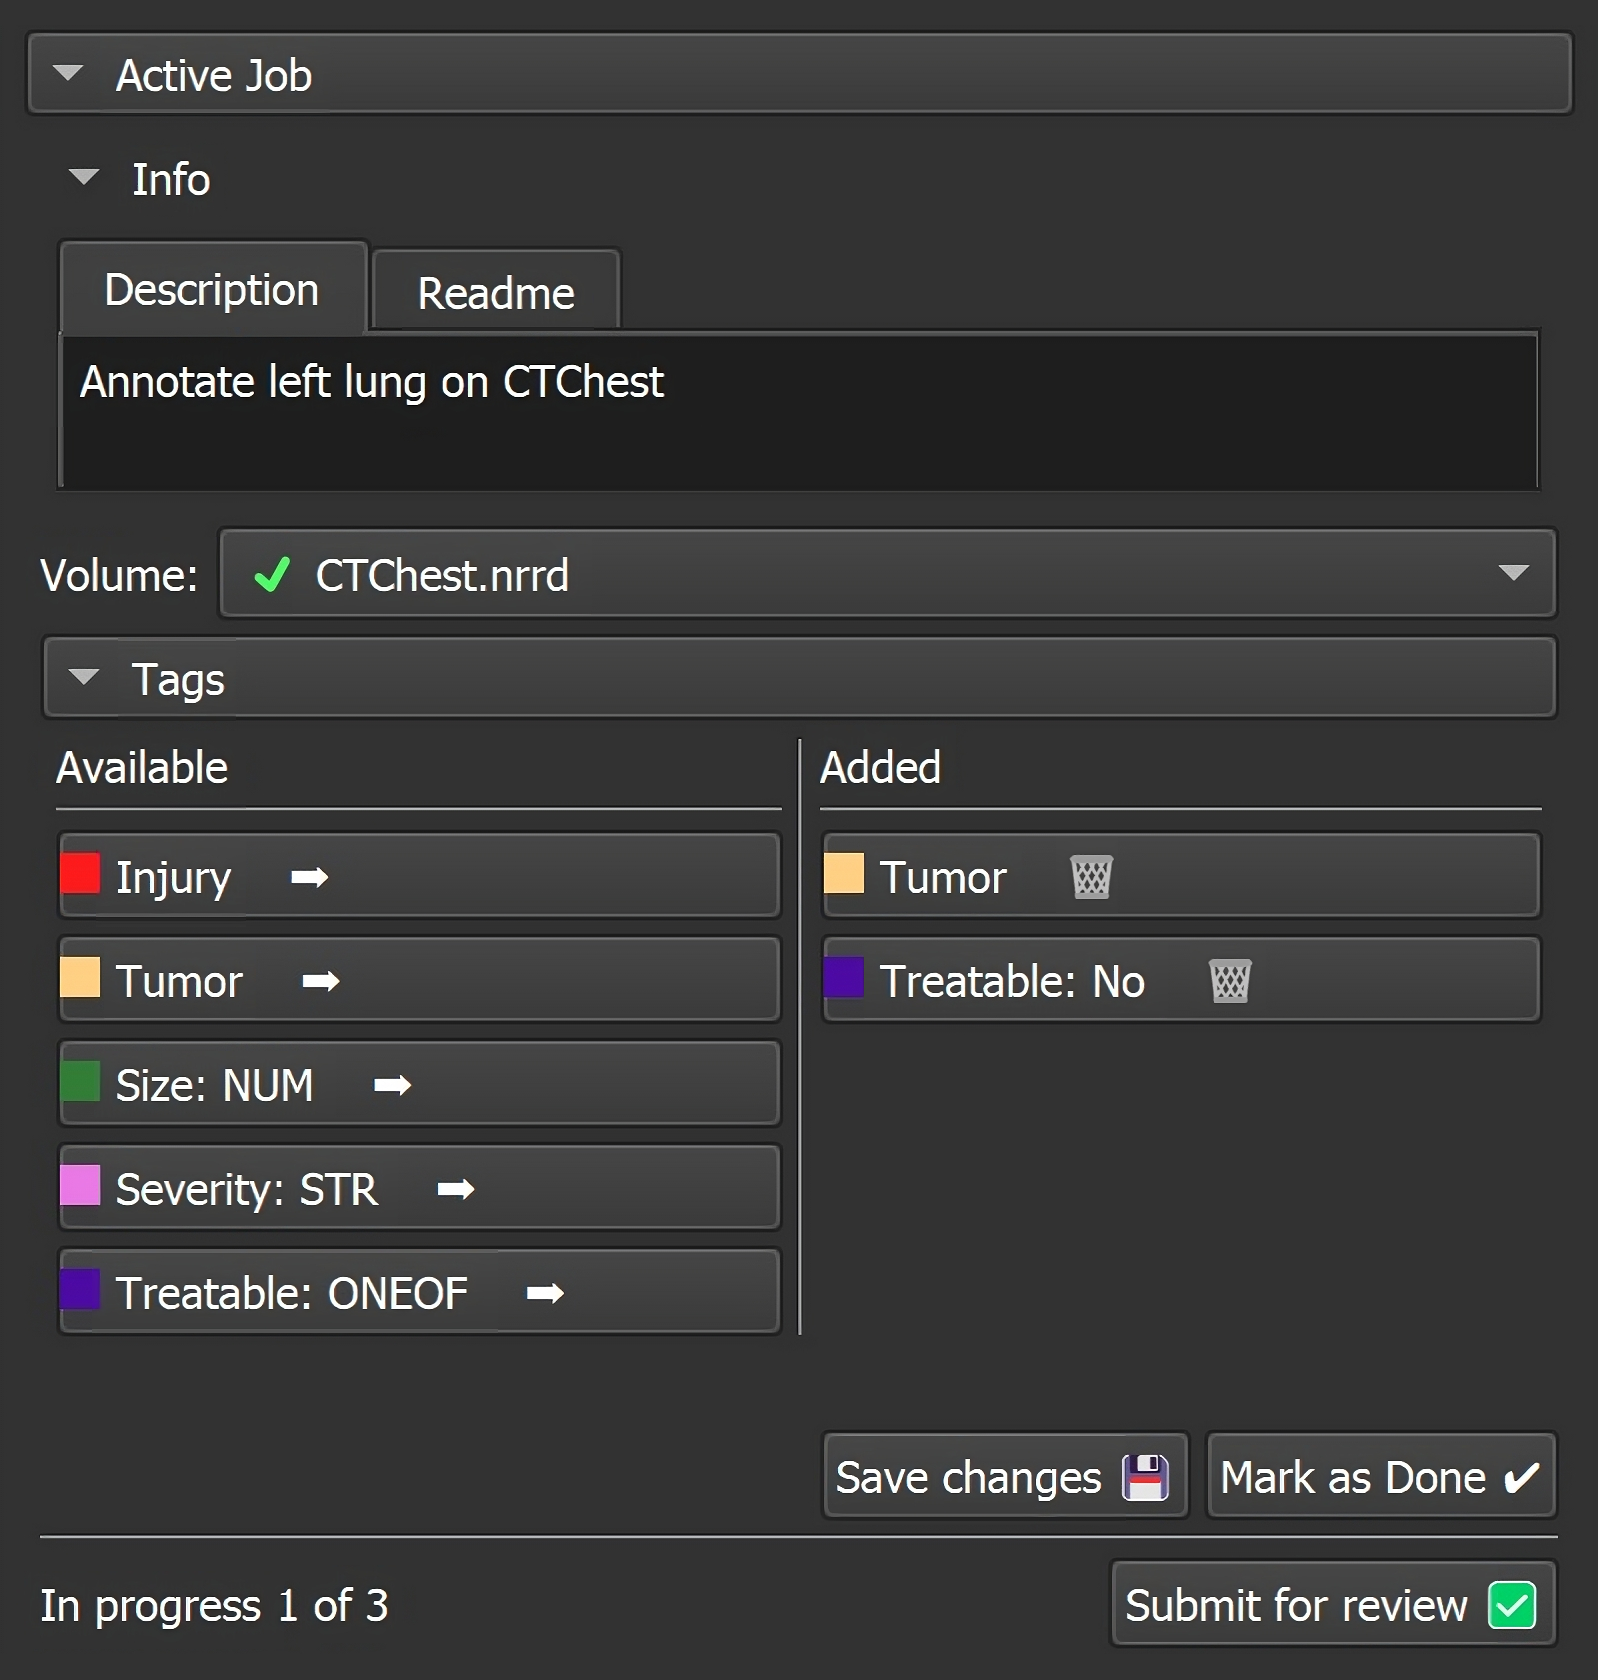 Labeling Jobs Annotating: Active Job
In the Labeling Jobs Reviewing module, this tab is almost the same. It contains the list of objects to be checked with their annotations. Also, here you can set statuses for Volumes based on which you can restart the Job or simply finish it, noting the result of completion.
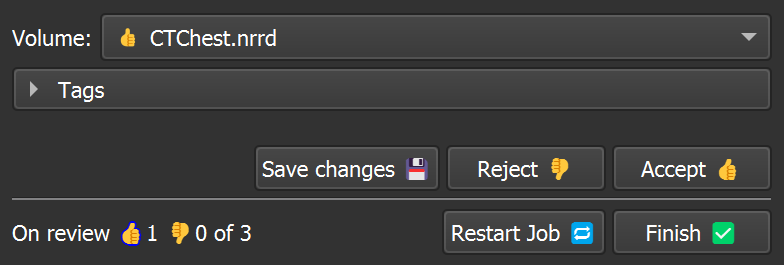 Labeling Jobs Reviewing: Active Job
☝️ For creating and editing annotations in both tasks the built-in 3D Slicer tools are used: Segment Editor, Segmentations etc.
Settings Tab
This tab is used to configure automatic triggers and other data-saving options. All new options and settings that will appear in the future can be found in this tab.
Step 5: Perform the annotation task
In an open Labeling Jobs Annotating module select the Team and Job you need to work on. Only those Jobs whose status is Pending or In progress, and you are the annotator for them, are displayed in the list.
Click the Start Labeling button - data will be downloaded from the server.
You will have the ability to update the list of available Jobs for the current Team at any time by clicking Refresh Jobs List, it won't reset your current working process.
💡 Speed up your workflow by starting it in Supervisely Labeling Tool and then switching to 3D Slicer. For example, if you need to mark a human lung quickly the best way to do it with the Smart Tool:
You can find a comprehensive description of how it works in the blog post "How To Use Model Assisted Labeling To Boost Annotation Performance With Supervisely".
If you have taken my advice on using SmartTool, you now need to Sync Job to get the latest modifications in the project.
As soon as the data is downloaded and saved in the Working directory (which can be adjusted in the Settings section), the Active Job tab will be unlocked.
After selecting the desired Volume, its data is automatically loaded.
In the module are loaded:
- A list of available and attached
Tagsto the Volume
On the scene are created:
Segmentationsthat are Classes available in the projectSegmentsthat are objects of these Classes
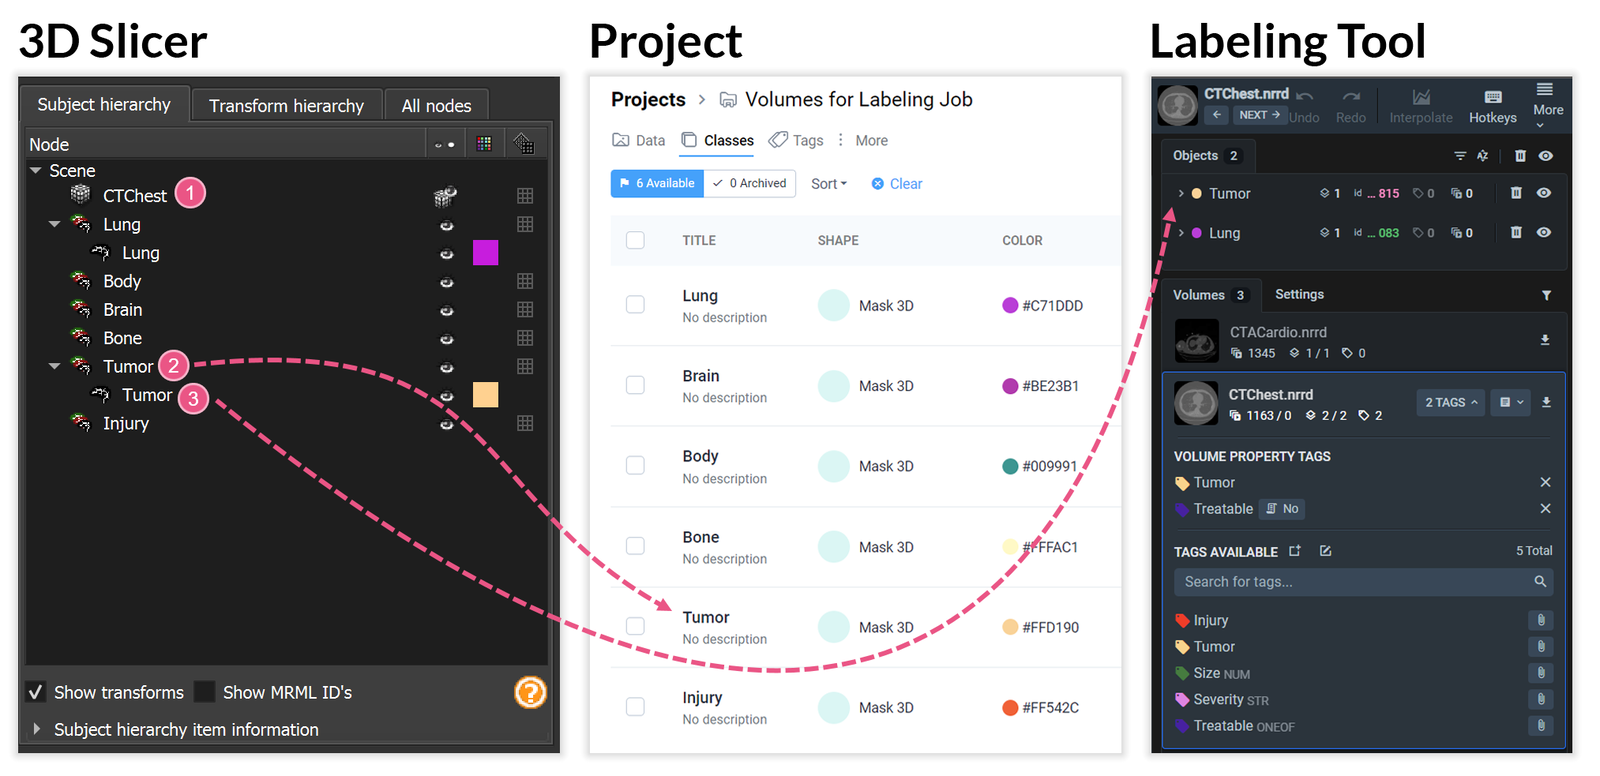
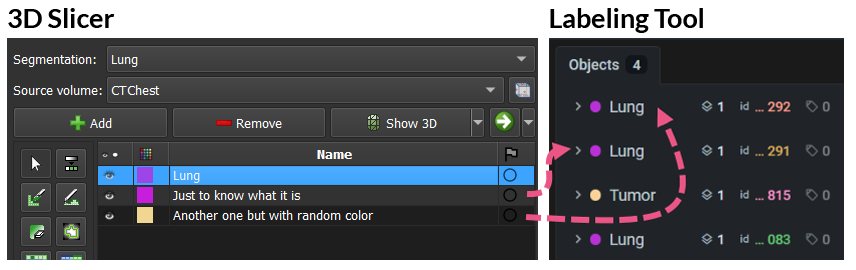
1Volume: CTChest.nrrd2Supervisely Class: Tumor → Slicer Segmentation: Tumor3Supervisely Annotation Object: Tumor → Slicer Segment: Tumor
🤓 object name is always the same as the class name
Now you can begin the annotation process.
Annotating
To edit, create or delete an annotation object, you need to go to any other 3D Slicer module that can work with objects on the scene. It is sufficient to use built-in modules such as Segment Editor, Segmentations, etc.
To create a new annotation object, simply select any of the Segmentation and add a new Segment. When creating objects, it is not necessary to name them and change their color, as they will be converted to class names and colors once they are uploaded to the server. If during the creation process, you need to change the name or color for convenience, you can do so without worrying about how it will be saved.
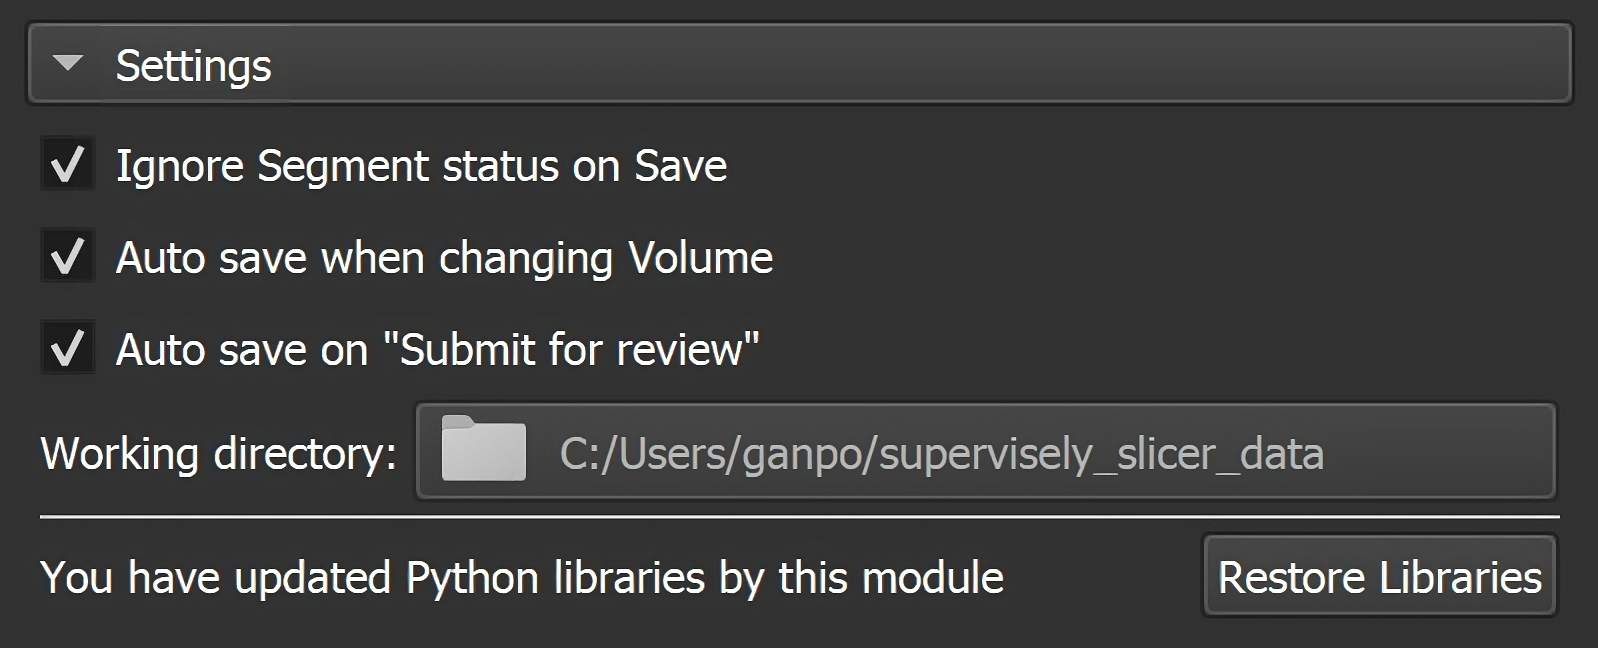
For Segment Editor there is an option to use Ignore Segment status on Save settings to control the process of saving annotated objects more flexibly.
Tagging
Tagstab won't be activated if there aren't any tags.- The availability of tags depends on the settings of the Labeling Job.
- Tags can be added ➕ and removed ➖.
The process is quite intuitive - clicking on any of the tags in the list of available tags will add it to the list of tags attached to the Volume. Conversely, clicking on an attached tag will detach it from the volume.
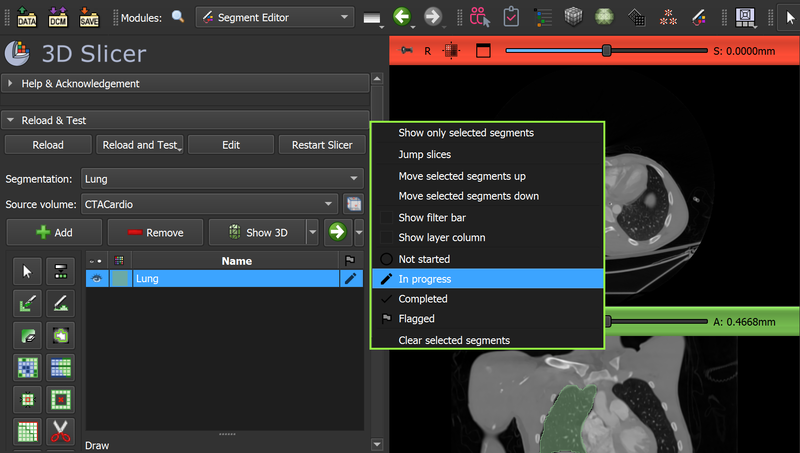
Status changing
Once you have created all the necessary annotations and saved the result, you need to set the "Done" status for the current Volume.
Don't worry, even if you forget something, you can make changes after the status is set.
Once you've completed all the tasks in the Labeling Job, the next logical step is to submit it for review by clicking the Submit for review button. The status of the Labeling Job will change, and it will disappear from the list. The scene and locally stored Job data will be cleared.
Step 6: Make a review
The review process is pretty much the same as the annotation process, except for some additional statuses, the ability to Restart or Finish Labeling Job, and module settings.
The Reviewer usually follows these guidelines:
-
Reads the technical description and proceeds to the corresponding module
Labeling Jobs Reviewing. -
Optionally makes corrections in annotations made by the Labeler.
-
Accepts 👍 or Rejects 👎 the Volume for which annotations have been made.
-
Once the reviewing process is finished for all data in the dataset, the Labeling Job may be finalized.
💡Extension settings explanation
A little explanation of how certain settings work
 Example: Annotating Module Settings
Remember login
The information with the server address and the account token received at the first login is saved to a .env file for further simplified connection to the platform.
Ignore Segment status on Save
When this setting is checked (default), all segments will be saved regardless of their status.
Otherwise, segments with the status Completed will be saved, and segments with the status In progress will initiate a save request.
Segments with all other statuses will not be saved, but their current state in the current scene not change. To reset their state you will need to Sync Job.
⚠️ Deleted segments will be deleted on Save regardless of settings and statuses.
 Segment statuses
Auto save when changing Volume
This setting allows you not to lose changes if you switch between Volumes and forget to Save manually.
Auto save on "Submit for review" Annotating module only
This setting automates saving when you're about to send the Labeling Job for review after completing work on the last Volume. If you've made changes since the last save but wish to submit it for review without these recent changes, uncheck the checkbox before doing so.
Restart Job with only rejected volumes Reviewing module only
There are two options for restarting the Job:
-
By default, it restarts the Job only with those Volumes that are marked as
Rejected. -
When the current setting is off, it automatically marks all unmarked Volumes (all that are not marked with
AcceptedorRejected) asRejectedand restarts the job like the first option.
Working directory
The user can configure the working directory where data will be stored locally when working with the Labeling Job.
Restore Libraries
If there are version conflicts with Python libraries during the installation of the Supervisely package, but you still wish to proceed with the installation, you have the option to restore the libraries to their original versions.
Summary
We try to expand the capabilities of our computer vision platform, as well as to expand the capabilities of other useful applications by integrating or adding the ability to work with the Supervisely.
Furthermore, we take into account the experience and wishes of our customers in this area. And one of the examples is the extension for 3D Slicer. It allows you to work from your favorite software programs with data on our platform as easily as if you were doing it from our web interface, but still use the power of all kinds of extensions available in the 3D Slicer catalog.
You can not only use it but also expand its capabilities at your discretion, as it is an open-source product. We look forward to your feedback and suggestions, let's stay in touch! 🤗
Supervisely for Computer Vision
Supervisely is online and on-premise platform that helps researchers and companies to build computer vision solutions. We cover the entire development pipeline: from data labeling of images, videos and 3D to model training.
The big difference from other products is that Supervisely is built like an OS with countless Supervisely Apps — interactive web-tools running in your browser, yet powered by Python. This allows to integrate all those awesome open-source machine learning tools and neural networks, enhance them with user interface and let everyone run them with a single click.
You can order a demo or try it yourself for free on our Community Edition — no credit card needed!
Liked this blog post? Share it!


Subscribe to new blog posts
Table of Contents
🤖 Try Supervisely: it's free!
Full stack platform with hundreds of Apps ready to solve any computer vision task: from labeling to model training. Create account


