
OWL-ViT Few-Shot Object Detection: Auto-Label Images With One Example
 Max Kolomeychenko
OWL-ViT finds objects from a text prompt or a single reference box. See how to run it in Supervisely and pre-label a whole dataset on your own GPU.
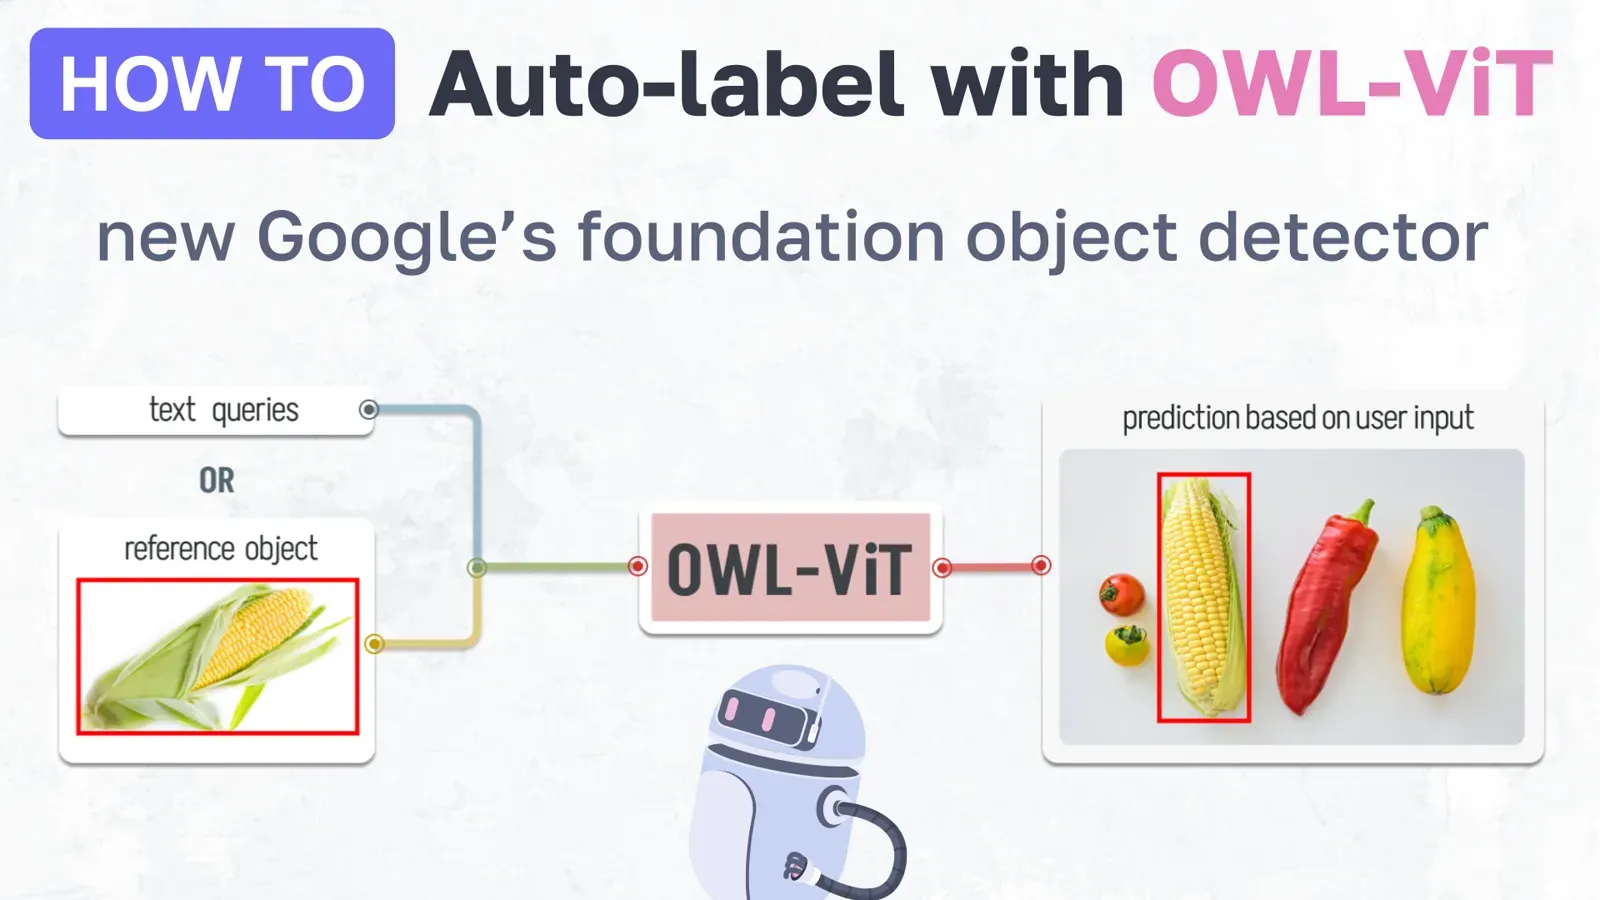
OWL-ViT is Google's open-vocabulary object detector. It finds objects on new images from a text prompt or from one example box, with no extra training. In Supervisely you can run it inside the image labeling toolbox or on a whole project, then correct the predictions by hand. This guide shows the steps.
The model takes an object example or a text prompt and detects the defined objects on other images. This lets you build object detection datasets faster, with manual correction of the predictions. It is one of the AI-assisted labeling options in Supervisely. For segmentation with clicks and boxes instead of detection, see the Smart Tool guide.
There is a lack of UI tools and easy-to-use integrations for OWL-ViT detection model. So we decided to customize, integrate and enhance with interactive UIs Google Research's official implementation

The class-agnostic OWL-ViT detector is now part of our Ecosystem of Computer Vision tools and models.
In this tutorial, we will show you how to automatically label your images using OWL-ViT - class-agnostic object detection model:
-
OWL-ViT is integrated into the labeling tool and can be used during annotation.
-
We designed a special interactive UI to get predictions on all images at once.
-
Follow this guide and try on your images in our Community Edition for FREE. The labeling tool itself is described in the docs.
Video tutorial
Watch the full video tutorial, that explains how to efficiently work with OWL-ViT foundation object detection model to automatically build custom datasets for object detection:
In this blog post and corresponding video tutorial we will go through 4 steps using the apps from Supervisely Ecosystem:
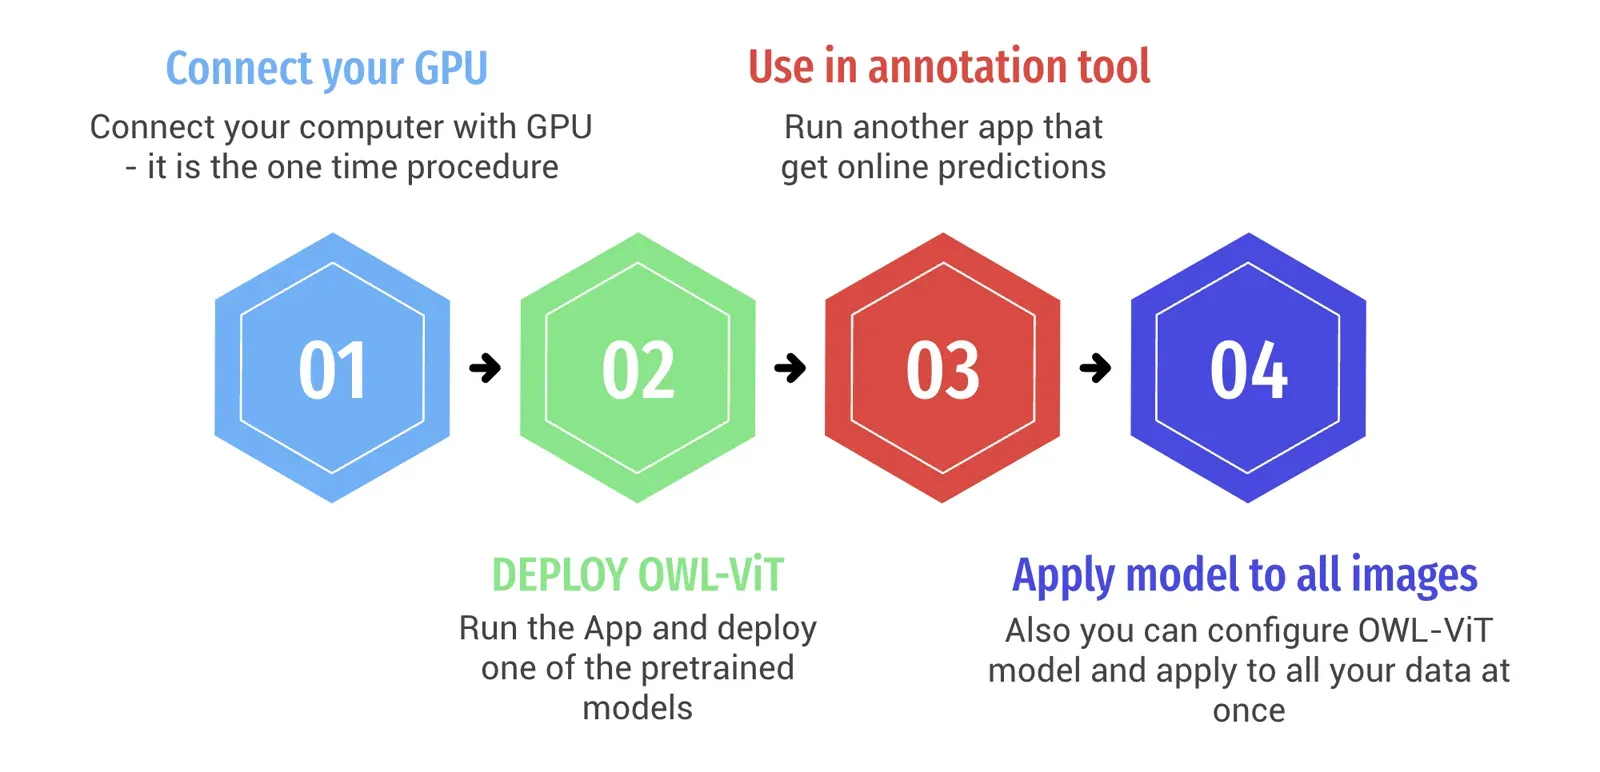 4 steps for this tutorial - connect your GPU -> deploy the model -> speed up manual annotation -> apply to all your data.
-
You need to connect your computer with GPU to Supervisely if you haven't connected it yet. It is the one-time procedure. This video explains how to do it. It is as simple as running the command on your machine.
-
Run one of the pre-trained OWL-ViT checkpoints in a few clicks. The model will be deployed as a service and other Supervisely Apps will be able to get predictions from it.
-
You can use the model inside the labeling tool right during the annotation. It is a matter of running the specially designed Supervisely App that is natively embedded into the labeling toolbox.
-
Or you can use another inference interface (Supervisely App) to configure the OWL-ViT inference setting, preview its predictions and apply it to all images in the project at once - everything with interactive UI and visualizations.
What is OWL-ViT model?
OWL-ViT is an open-vocabulary object detection model based on vision transformers, made by Google Research (paper). OWL-ViT foundation model is class-agnostic: this neural network can detect objects of any class.
Open-vocabulary means that the model can work with any objects defined by a text description (text prompt) or image example (reference image). This feature opens up opportunities for use in automatic image annotation pipelines and allows users to pass custom requests to the model without additional training.
This model is a foundation object detector and it means that it was trained on a huge number of pairs of images and text descriptions from the internet and finetuned on the publicly available object detection datasets. It "understands a lot" out of the box and can be used without additional training. It can detect objects it was not trained on directly, but accuracy varies by domain, so check the predictions on your data.
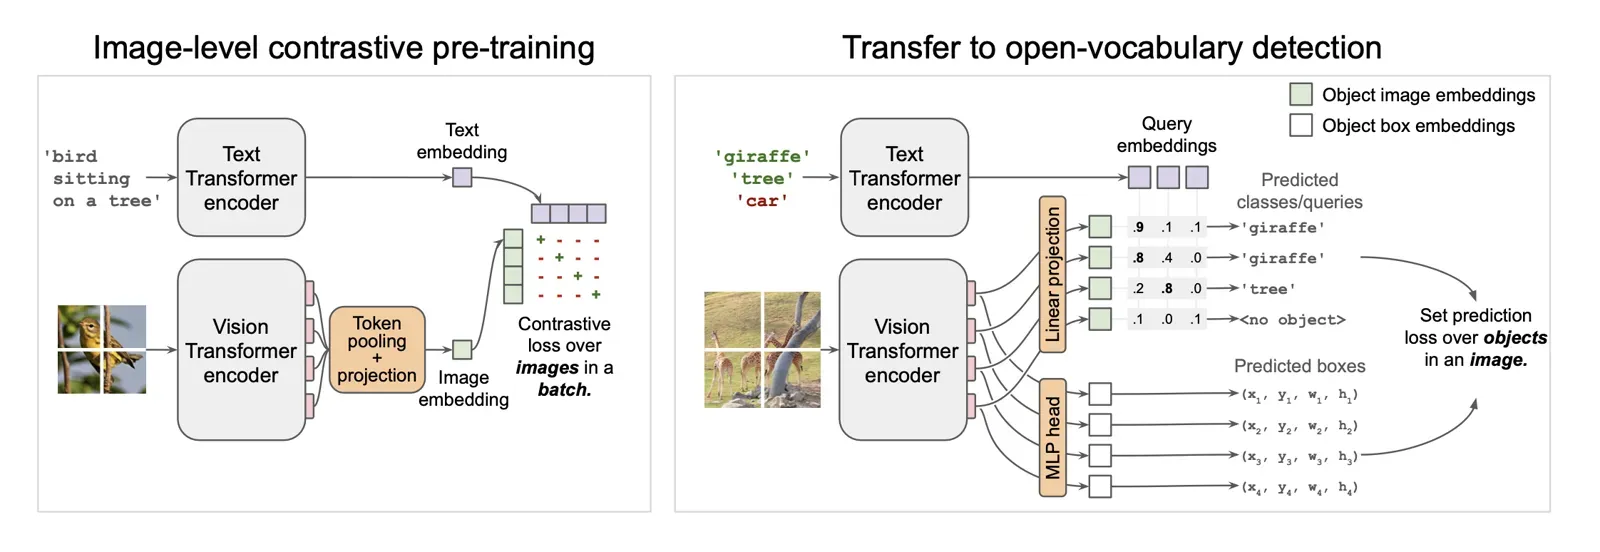 From the paper: Overview of the OWL-ViT method. Left: We first pre-train an image and text encoder contrastively using image-text pairs, similar to CLIP, ALIGN, and LiT. Right: We then transfer the pre-trained encoders to open-vocabulary object detection by removing token pooling and attaching lightweight object classification and localization heads directly to the image encoder output tokens. To achieve open-vocabulary detection, query strings are embedded with the text encoder and used for classification. The model is fine-tuned on standard detection datasets. At inference time, we can use text-derived embeddings for open-vocabulary detection, or image-derived embeddings for few-shot image-conditioned detection.
This task is also called prompt-based object detection. Prompt-based object detection is a task when a class-agnostic detection model takes text or visual prompt as input and detects objects that are the most relevant to the input prompt.
OWL-ViT supports two kinds of prompt-based object detection: zero-shot text-conditioned and one-shot image-conditioned.
How does one-shot (few-shot) object detection with OWL-ViT work?
One-shot image-conditioned object detection means that the model detects objects (object detection) using only one (one-shot) visual example (image-conditioned). You should provide a single bounding box around the object of interest and the model will try to detect all objects similar to the input example. Sometimes such an image example is called a "reference image".
See the example below where the user localizes different objects on a microcircuit and the model automatically predicts similar objects on another image without training. On the left you see a target image with one reference example, on the right - automatic model prediction on another image.
How does zero-shot text-conditioned object detection work?
Zero-shot text-conditioned object detection means that the model detects objects (object detection) without any visual example (zero-shot) using only a text prompt (text-conditioned). You should provide a text prompt and the model will try to understand your text input and localize the objects most relevant to your text description.
In the example below user names the fruits and other objects with text and the model automatically predicts all relevant objects on the image.
Text prompt or reference box: when to use each?
Use a text prompt when you can name the object in words. Use a reference box when you can show an example object instead, as with the components on a microcircuit in this guide. Both modes need no extra training.
| Zero-shot, text prompt | One-shot, reference box | |
|---|---|---|
| You provide | A text description of the objects | One bounding box around an example object |
| Example in this guide | Names of fruits on a still life | Components on a microcircuit |
| Extra training | None | None |
| Where to set it | NN image labeling app and the batch inference app | Same two apps |
Step 1: connect your GPU
OWL-ViT detector is a large base neural network. It is better to run it on GPU to achieve a better user experience and predict thousands or even millions of images faster. Thus, the app requires GPU for reasonable inference time. If you haven't connected your GPU to Supervisely account yet, we recommend you to do that - it is a one-time procedure, and you can run any apps on your machine, including NN training and inference. Run Supervisely Agent on your computer and it will automatically connect your machine to the platform. Follow the guides on the platform or watch this 2-minute video tutorial.
Step 2: run the OWL-ViT model
Just run the Supervisely App which deploys the OWL-ViT model:
Serve OWL-ViT
Class-agnostic interactive detection for auto-prelabeling
Once the model is deployed, other applications can communicate with the model to get its predictions.
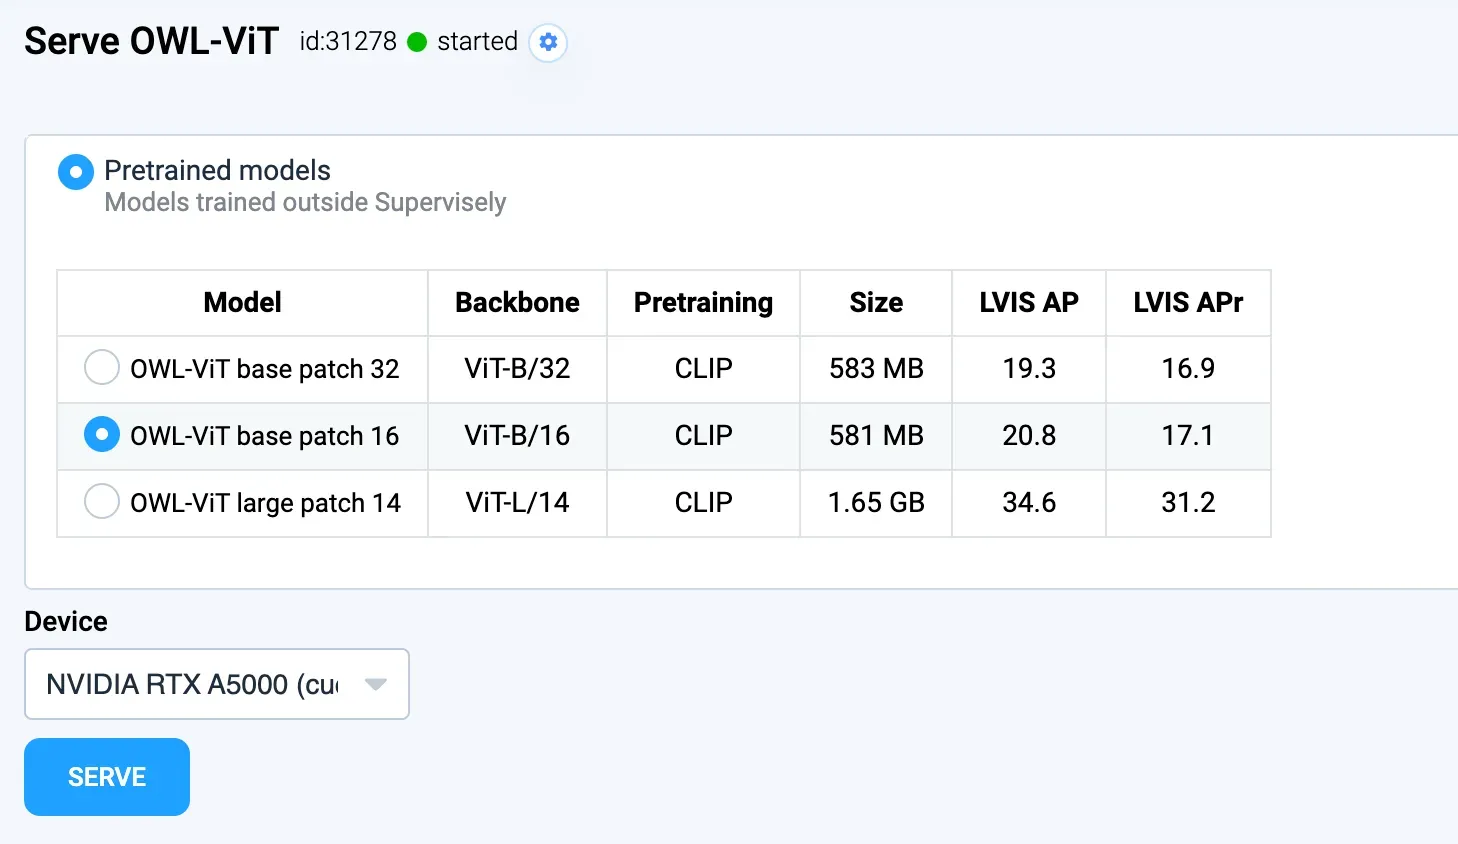 Deploy one of the pre-trained models
Step 3: use OWL-ViT in the annotation tool
The OWL-ViT neural network can be used to significantly speed up the manual annotation process:

NN Image Labeling
Use deployed neural network in labeling interface
-
Open the labeling interface
-
Run the app
NN image labelingright inside the labeling tool from the Apps panel. -
Connect to the deployed model
-
Label only one example with a bounding box and the model will save it as a reference object (or define a text prompt)
-
Apply the model to an opened image, correct predictions manually if needed and go to the next one.
-
To change the reference object, you should select the new object and press "Apply model to ROI". The model will save it as a new reference example.
Step 4: predict with OWL-ViT on all images at once
We designed and implemented the special Supervisely App with a user-friendly UI that allows you to configure OWL-ViT model, preview and visualize results and get predictions on all images in a project. Thereby, you can automatically pre-label objects of any classes in your custom dataset.

Apply OWL-ViT To Images Project
Class-angnostic object detection model
-
Select the input project or dataset.
-
Connect to the deployed OWL-ViT model (deployed in step 2).
-
Choose inference mode - text prompt or reference image
-
In "reference image" mode you should select an image from your dataset and annotate one example of a target object with the bounding box. In "text prompt" mode you should define the text description of objects that should be automatically detected.
-
Define additional inference settings, including the confidence threshold. All predicted objects with the model confidence less than the threshold will be skipped.
-
Preview predictions on random images from your dataset. Press the "predictions preview" button as many times as needed to sample the random batch of images and visualize model detections on them.
-
Apply to your data. A new project with the input images and annotations automatically generated by OWL-ViT will be created.
Pro tip: In some cases, the OWL-ViT model is sensitive to the input bounding box. If the model predictions are not good enough on your data, just play with the reference bounding box - make it tight and close to the object edges or, opposite, add some padding around the object edges. It is a matter of experiments to find the best input settings for your custom datasets.
Summary
In this guide, we explained the main terminology around the topic of open-vocabulary object detection. In the video tutorial, we demonstrated the powerful and easy-to-use solution for these two computer vision tasks: one-shot image-conditioned object detection and zero-shot text-conditioned object detection.
OWL-ViT is integrated into the Supervisely Ecosystem. It can be used directly during the annotation inside Supervisely's labeling toolboxes. We designed and implemented user-friendly UIs for deployment, inference and predictions for all models in the category of prompt-based object detection. Thus, OWL-ViT model and similar ones can be used as efficient instruments for the automatic pre-labeling of custom training datasets.
The Supervisely apps used here are open source on GitHub, so you can read or adapt them.
Frequently asked questions
What is OWL-ViT?
OWL-ViT is an open-vocabulary object detector from Google Research, built on vision transformers. It is class-agnostic, so it can detect objects of any class that you describe with a text prompt or show with a reference box, without extra training.
What is few-shot (one-shot) object detection?
The model gets a single bounding box around an example object, called a reference image, and tries to find all similar objects on other images. No training step is needed.
What is zero-shot text-conditioned detection?
You type a text description of the objects you want, for example the names of fruits, and the model localizes the objects that best match the text. No example image is needed.
Do I need a GPU to run OWL-ViT in Supervisely?
Yes. OWL-ViT is a large base network, so the app needs a GPU for a reasonable inference time. You connect your own GPU computer to Supervisely once by running the Supervisely Agent command on it.
Can I use OWL-ViT while labeling, or only on a whole dataset?
Both. The NN image labeling app runs inside the labeling tool and predicts on the open image. A separate app applies OWL-ViT to all images in a project at once and saves the result as a new project.
What if the predictions are not good enough?
The model can be sensitive to the reference box. Try a tight box close to the object edges, or add some padding around the object, and compare the results on your data.